
 |
 |
|
|
 08-09-2010, 02:04 PM
|
#91 |
  
Drives: 06 Polar White 5dr, 13 Soul 4u Join Date: Oct 2008
Location: Georgetown, Ontario, Canada
Posts: 5,762
|
Something dosn't look quite 100% here. Is the hood not fully closed? Seems like it's riding high along the front edge and around lights.
__________________

|

|

|
|
08-09-2010, 04:05 PM
|
#92 |
|
ヤリスワールド

Drives: 2008 HB Join Date: May 2010
Location: seattle
Posts: 380
|
I have one that's due To be shipped...we should be able to have it painted and installed in a few days after delivery .will post pics of how one looks painted and installed.we also are working on a air box design to make the scoop feed air to the factory air intake.
|
|
|
|
|
08-09-2010, 04:07 PM
|
#93 |
|
El Huevo

Drives: 2007 Liftback Join Date: Aug 2006
Location: CEN*CAL
Posts: 959
|
pm me the picked up price, i may be down there tomorrow
__________________
 
|
|
|
|
|
08-12-2010, 02:47 PM
|
#94 |
|
ヤリスワールド
Drives: 2008 HB Join Date: May 2010
Location: seattle
Posts: 380
|
Hood came in today...looks good as with all glass items it will need work before paint.I just finished reshapeing and enlargeing scoop inlet,underside of hood is finished well for this type of glass hood. Also the little air box cover was a surprise it will make a functional air box design a snap.
From this point ,I say it's good and while not for the 100% novice if you have just a bit of skill and can paint or know a painter it's worth it ...IMO to buy one. Will post before and after pics and post more info as we prep and paint it. We also just went by garms test fit and did not pre-test hood before paint...the edges look good so with garms test I will take a chance. Last edited by annn; 08-12-2010 at 03:12 PM. |
|
|
|
|
08-12-2010, 06:09 PM
|
#95 |
|
ULTIMATE Drives: 07 Yaris Turbo Join Date: May 2007
Location: Canoga Park, CA
Posts: 14,859
 |
CTScott worked out an easy fix for that latch by the way, he should be posting that up soon.
__________________
Micro Image forums, online store and shop are now closed. It was a great eight year run, but it was time to focus on other things. I'm still selling parts on eBay under micro*image seller ID and customers can still make requests for anything specific. |
|
|
|
|
08-12-2010, 08:27 PM
|
#96 | |
|
ヤリスワールド
Drives: 2008 HB Join Date: May 2010
Location: seattle
Posts: 380
|
Quote:
 Here are some as removed from box pics.... |
|
|
|
|
|
08-12-2010, 09:10 PM
|
#97 |
ULTIMATE
Drives: 09 5dr LB, 2x 08 3dr LB Join Date: Oct 2008
Location: USA, CT
Posts: 13,460
|
I received mine today as well. The UPS guy saw that it was a Micro Image package that said CF Hood on it, so he made me open it before he left, so he could check it out (and, he was quite impressed).
Installing it was super quick and easy. I noticed, as Garm mentioned, that the latch wasn't catching correctly. Nothing was rubbing, but rather I found that the latch couldn't close around the MI hood's striker (the U shaped metal piece). I measured the OEM hood's and the MI Hood's strikers and found that the MI one was about 1/32" larger than the OEM one. To open the latch catch enough to allow the MI striker to catch, I removed the hood latch ran a 5/16" drill bit through the opening in the catch. After doing so, I reinstalled the latch and the hood closed and latched without issue. Here are some pics of the hood installed: 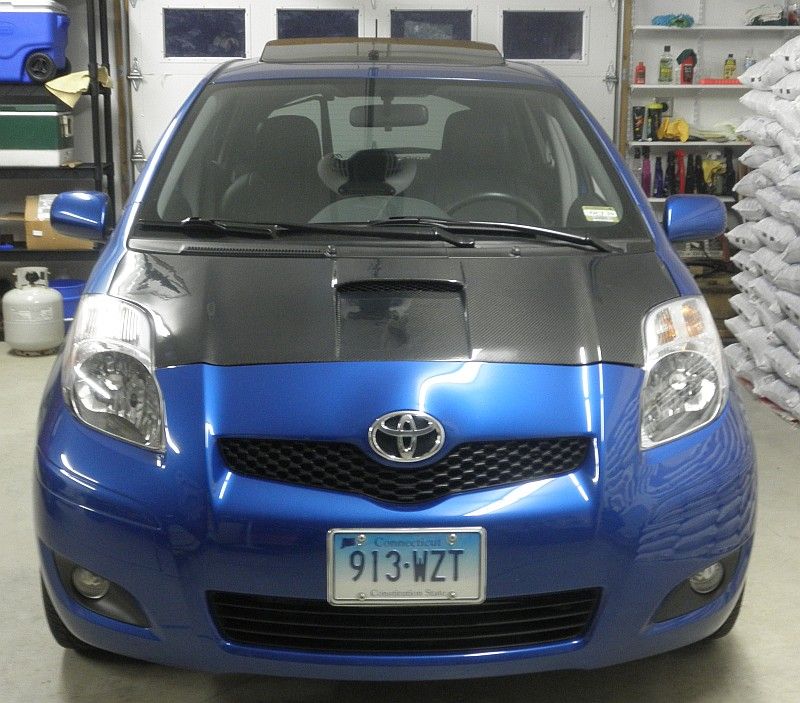 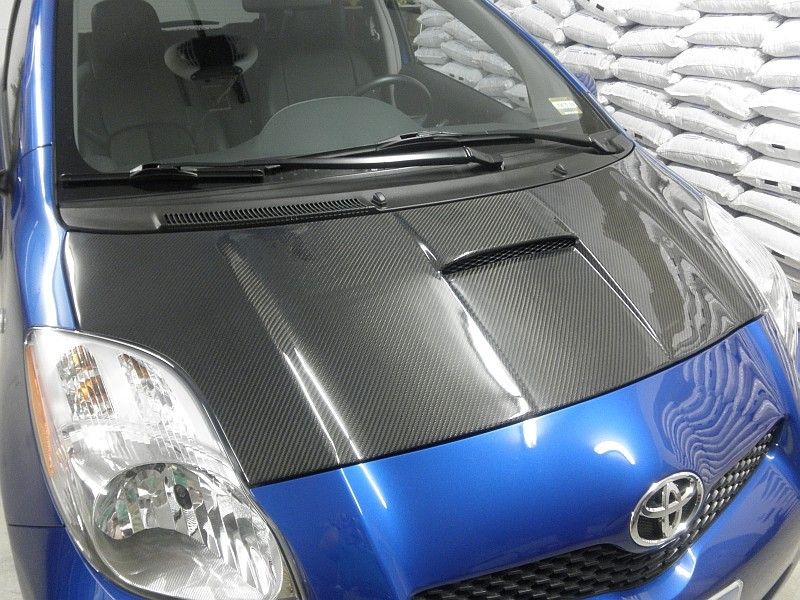 Here are some bottom views. I am very impressed with the construction. The scoop can be functional, or you can leave the bottom cover on to have it just be cosmetic. The hood prop hole was perfect as well. Bottom view with scoop cover on: 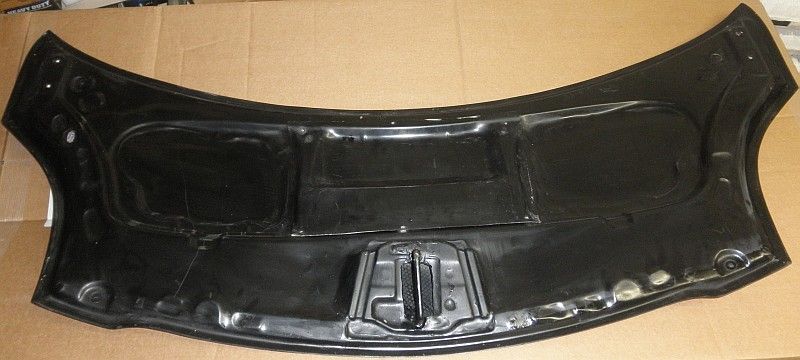 Scoop cover removed: 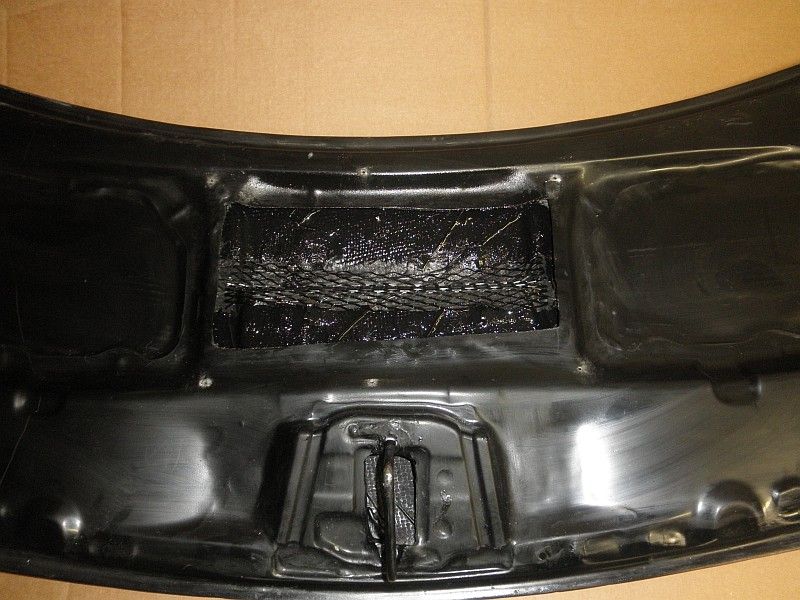 Close-up of hinge bolt inserts. I mounted the hood with the stock centering bolts to test alignment and was amazed that I was able to leave them on, and didn't need to switch to the included bolts, which allow for adjustment. 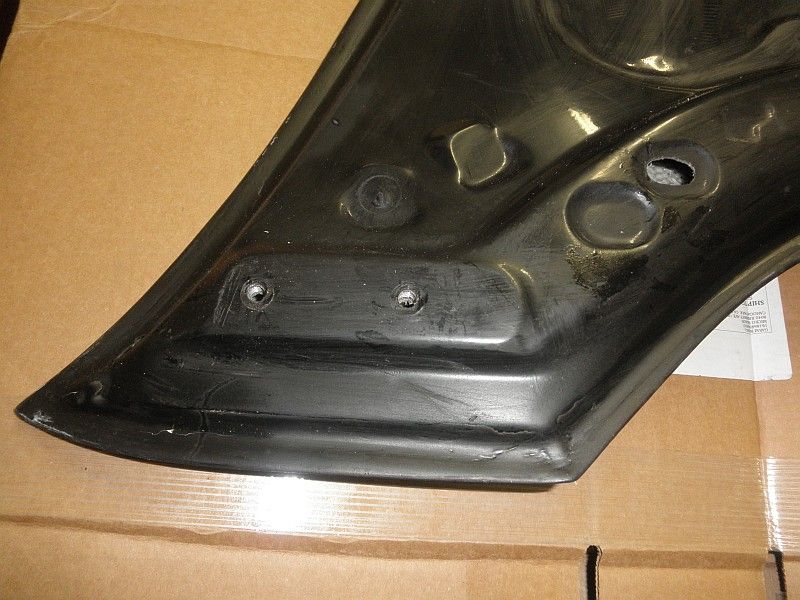 Here's my procedure for opening the hood latch catch to allow the hood to close properly: 1. Remove the 3 mounting bolts (10mm socket required) for the latch. 2. Disconnect the hood release cable. Push the bracket with the ball-end attached towards the cable and slip the ball-end out of the slot. 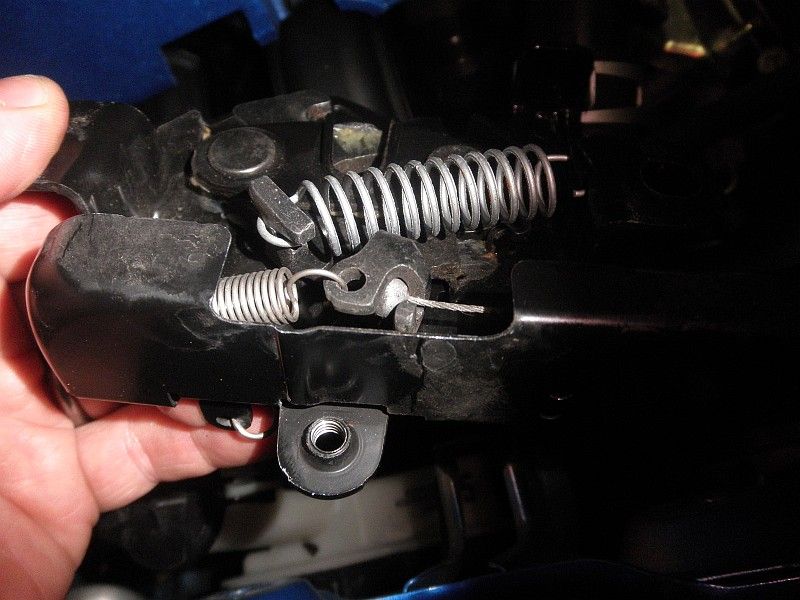 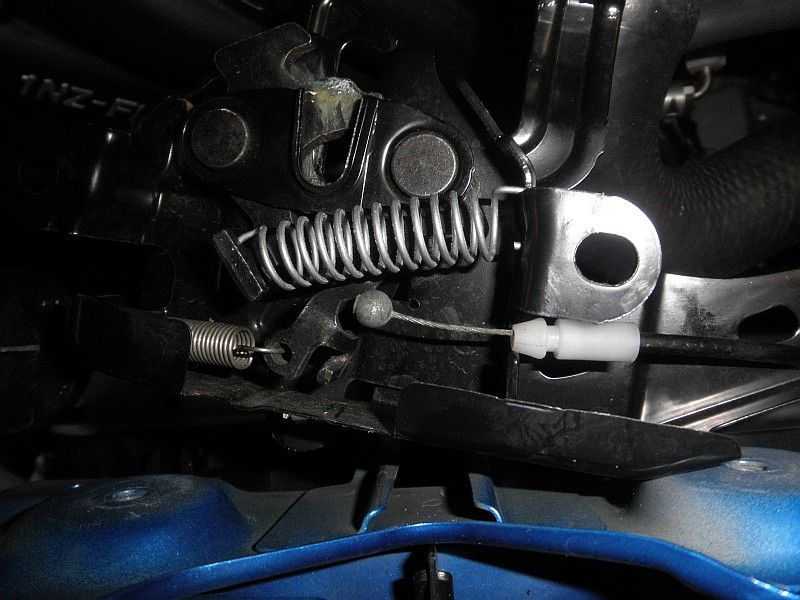 3. Latch the hood latch as if the hood is closed by pushing the catch down with a screwdriver. 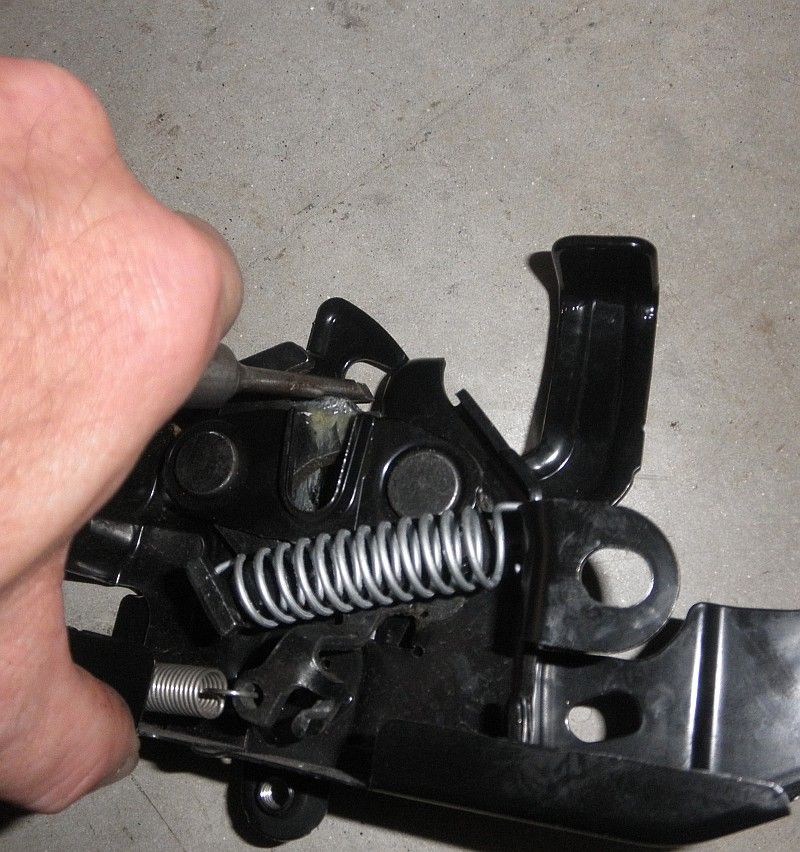 4. With the latch closed, run a 5/16" drill bit through the slot where the striker is held when latched. 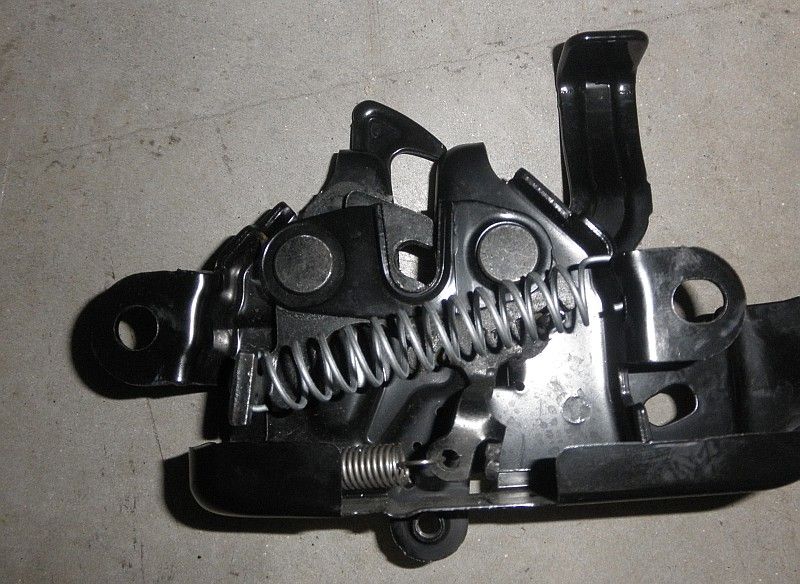 5. Before reinstalling the latch, release the catch by pulling the lever where the hood release cable connects.  6. When reinstalling the latch, make sure it is centered on the striker and is up as high as it will go. |
|
|
|
|
08-12-2010, 09:44 PM
|
#98 |
|
ヤリスワールド
Drives: 2008 HB Join Date: May 2010
Location: seattle
Posts: 380
|
what about reducing the outside dia of the striker on the mi hood..same effect i would think ?? or am i missing something....thanks for info...LOOKS GREAT !!!!
|
|
|
|
|
08-12-2010, 10:34 PM
|
#99 | |
|
ULTIMATE
Drives: 09 5dr LB, 2x 08 3dr LB Join Date: Oct 2008
Location: USA, CT
Posts: 13,460
|
Quote:
|
|
|
|
|
|
08-13-2010, 12:56 AM
|
#100 |
|
ULTIMATE Drives: 07 Yaris Turbo Join Date: May 2007
Location: Canoga Park, CA
Posts: 14,859
|
I tried to grind the striker down and got frustrated, I like your way better than either of my solutions. Pics are great, thank you!
__________________
Micro Image forums, online store and shop are now closed. It was a great eight year run, but it was time to focus on other things. I'm still selling parts on eBay under micro*image seller ID and customers can still make requests for anything specific. |
|
|
|
|
08-13-2010, 01:20 AM
|
#101 |

Drives: '07 Yaris turbo, '11 Juke Join Date: Mar 2007
Location: Riverside, CA
Posts: 849
|
I wonder if this will work on my hood. Gonna give it a try this weekend. I wish I could use the stock bolts on mine.
__________________
http://www.cardomain.com/ride/3875996 |
|
|
|
|
08-13-2010, 01:20 PM
|
#102 | |
|
#1 Lemming

Drives: Light Blue '08 Yaris Join Date: Mar 2010
Location: Milwaukee, WI
Posts: 760
|
Quote:
Looks great Scott!* Thanks for the ever and always helpful solution to yet another Yaris problem! *great Scott...I crack myself up LOL
__________________

|
|
|
|
|
|
08-17-2010, 05:52 PM
|
#103 |
|
ヤリスワールド
Drives: 2008 HB Join Date: May 2010
Location: seattle
Posts: 380
|
will be while on the fiberglass version before we can post pics of it finished and installed ....lots of work need to get it right also the paint/coating that comes on it will 100% need to be removed !!! unless you just slap on a black hood and call it good....but if you paint to match that "stuff" is very bad and needs to be removed !!
Last edited by annn; 08-17-2010 at 06:08 PM. |
|
|
|
|
08-17-2010, 06:11 PM
|
#104 |
|
ULTIMATE Drives: 07 Yaris Turbo Join Date: May 2007
Location: Canoga Park, CA
Posts: 14,859
|
yeah that makes sense. I don't know why these companies don't just put a little primer on it and leave it alone.
 looking good so far!
__________________
Micro Image forums, online store and shop are now closed. It was a great eight year run, but it was time to focus on other things. I'm still selling parts on eBay under micro*image seller ID and customers can still make requests for anything specific. |
|
|
|
|
08-17-2010, 06:24 PM
|
#105 | |
|
ヤリスワールド
Drives: 2008 HB Join Date: May 2010
Location: seattle
Posts: 380
|
Quote:
|
|
|
|
|
|
08-18-2010, 12:46 PM
|
#106 |
|
ULTIMATE Drives: 07 Yaris Turbo Join Date: May 2007
Location: Canoga Park, CA
Posts: 14,859
|
^ ewww, weird, no idea what that is. rubberized paint? LOL
__________________
Micro Image forums, online store and shop are now closed. It was a great eight year run, but it was time to focus on other things. I'm still selling parts on eBay under micro*image seller ID and customers can still make requests for anything specific. |
|
|
|
|
08-18-2010, 04:44 PM
|
#107 | |
|
ヤリスワールド
Drives: 2008 HB Join Date: May 2010
Location: seattle
Posts: 380
|
Quote:
|
|
|
|
|
|
08-21-2010, 12:14 AM
|
#108 |
|
ヤリスワールド
Drives: 2008 HB Join Date: May 2010
Location: seattle
Posts: 380
|
Pic of the pre-paint test fit....so far had to enlarge prop rod hole,lots of pin holes in fiberglass to fix,fit is good overall,had to cut latch and do the "socket" mod, did a few other things but none worked to get hood to latch,still not perfect.
|
|
|
|
 |
| Thread Tools | |
| Display Modes | |
|
|
 Similar Threads
|
||||
| Thread | Thread Starter | Forum | Replies | Last Post |
| Micro Image Rocks and so do Yokohama S.drives in the rain! | 03Z33 | General Yaris / Vitz Discussion | 17 | 12-14-2011 10:08 PM |
| Micro Image meet Jan 30, 2010 | Brian | Photo-Video-Media Gallery | 57 | 02-06-2010 10:27 PM |
| Micro Image Parts FOR SALE | 1NZYaris1 | Items for Sale by private party | 0 | 01-11-2010 10:22 PM |
| Mid-West Chapter Micro Image Car Club | lilredrocket | Southwest | 10 | 10-05-2009 01:06 PM |
| Micro Image Hood Design Contest | cali yaris | Micro Image | 209 | 10-04-2009 02:49 AM |


 Linear Mode

