
 |
 |
|
|
 10-20-2009, 04:32 AM
|
#1 |
|
37HSSV

|
3 Drive Throttle Contoller by NTD
Sorry guys for the delay, but I had to fix the computer last night after it crashed...
Well, as of this week I had received the NTD 3 Stage Throttle Controller, its function is that compared to the Blitz unit, which is to alter the throttle input and output of the accelerator pedal to the engine. This consists of either advancing or retarding the actual signal position. Same effect, Blitz probably has more settings and it has better looks, but this unit does the job at half the cost. This unit was provided by Twpanson, he is currently in the steps of becoming a vendor, along with a group buy for the future. Please note that my last recorded MPG was 32.3mpg, this was done over a 3 day period while driving for my job, which best details at 25% highway usage and 75% city. Modifications to my car at time of install: AEM Intake, 2 inch resignator back exhaust, 16x7 inch rims with 215/45/16 Hankook Ventus RS-2 tires, Tein Basic Coilovers, Tanabe Strut Brace, Megan C pillar brace, Rear seat removal, Corbeau CR 1 Racing Seats with Harness. I post this because some people get higher MPG than me, some lower, all depends on what mods you have done. Box day: I received the unit via USPS and I found 2 boxes within its contents. One being the actual “readout device” the other being the wiring harnesses and control box, another baggie came with the reverse light cutout wire and 2 double sided tape for mounting the control box and readout device. Included is 2 instruction manuals, both are pretty easy to figure out.  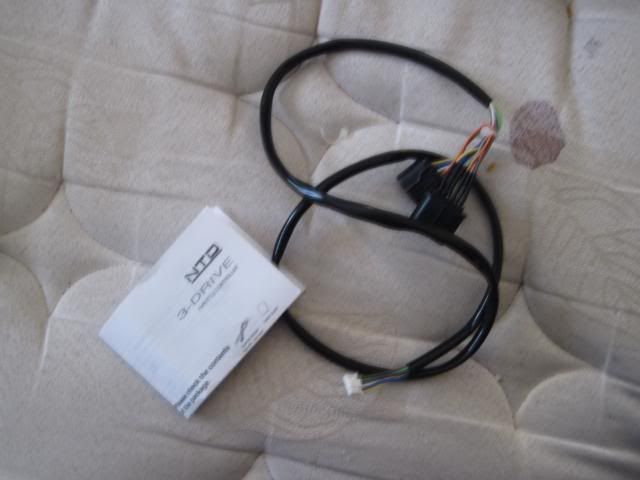 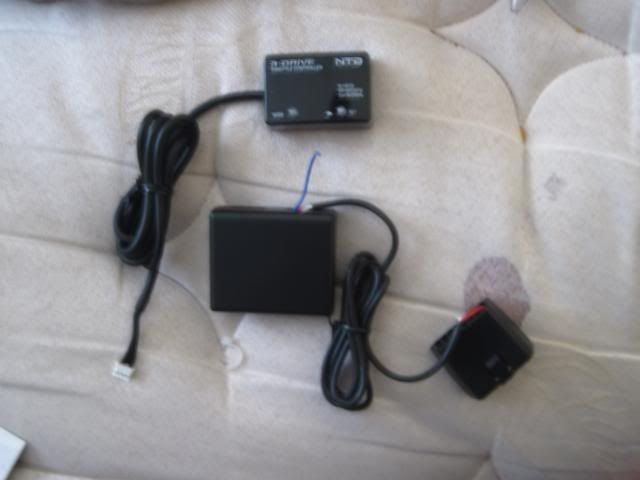 Install day: The unit is very easy to install, took me less than 45 mins to install. Took more time finding a good mounting location and fabricating a mount than actually installing the harnesses and control box and readout. Steps are easy to figure. First it is best to open up the fuse area under the steering wheel, this can be some my gently pulling on it until it comes open, this basically gives you an easy area to mount the control box, and run some wires where needed. Also you need to make sure that your car is in the LOCK/ Off position. First pic is of the accelerator, if you notice on the top the harness that connects the accelerator to the engine bay. 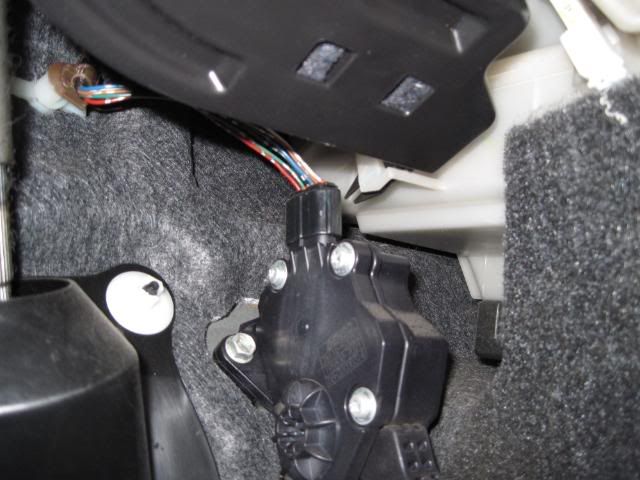 First actual step to the install is to remove the harness from the accelerator, it was a little hard, but its simply press down the clasp that is holding the two together and try and wiggle it off. Be gentle, because to replace either would be costly. 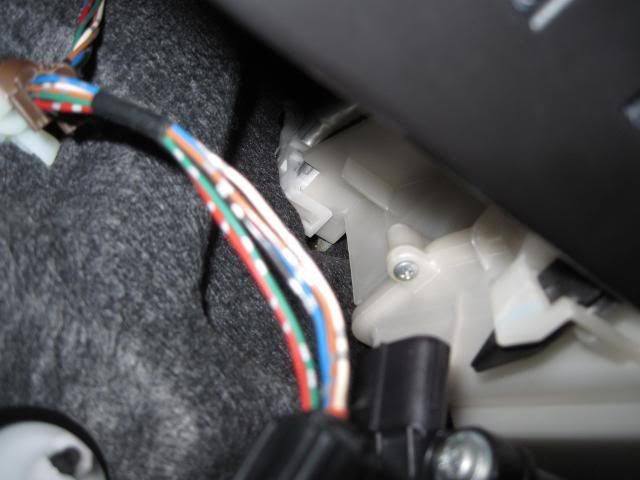 Second step is to connect the harness that runs to the engine bay to the one end of the double ended harness, you can tell which ends need to go where by looking at them. 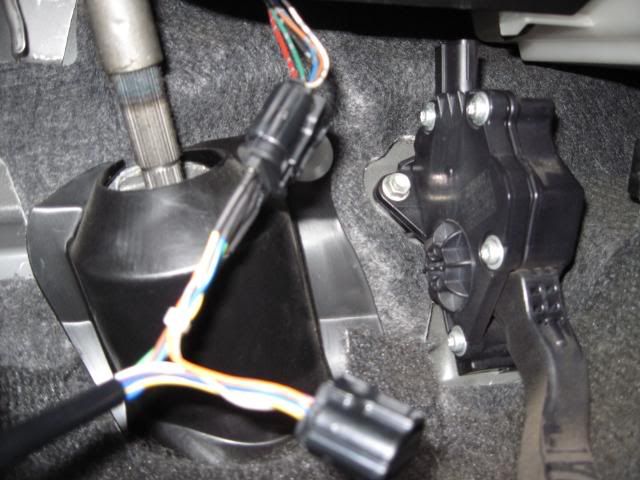 Third step is to then connect the other end of that harness to the accelerator pedal. 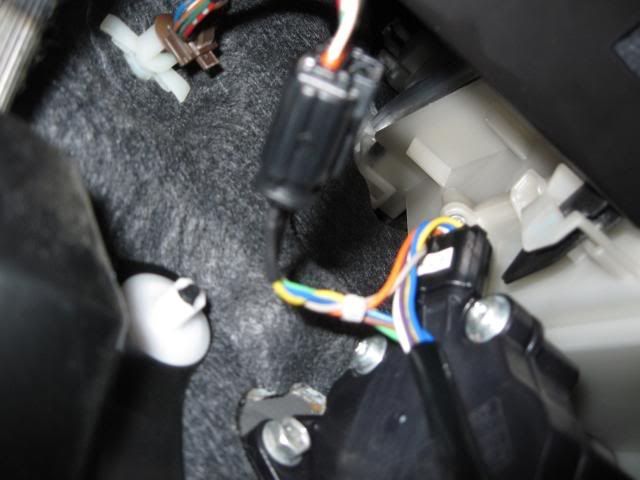 Fourth is to connect the harnesses to the control box, and yes I know there’s a nickel on my floor. 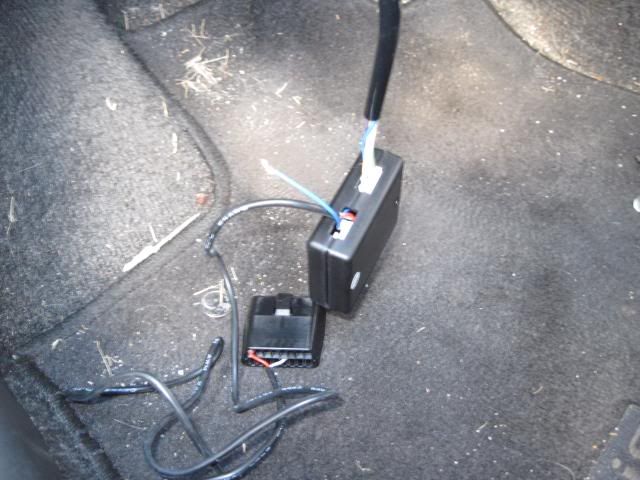 Mounting the control box to a solid plastic part of the car can be done using one of the two double sided tapes included in this kit I chose to mount mind right below the steering wheel behind the door that you open to access the area below the steering wheel.. 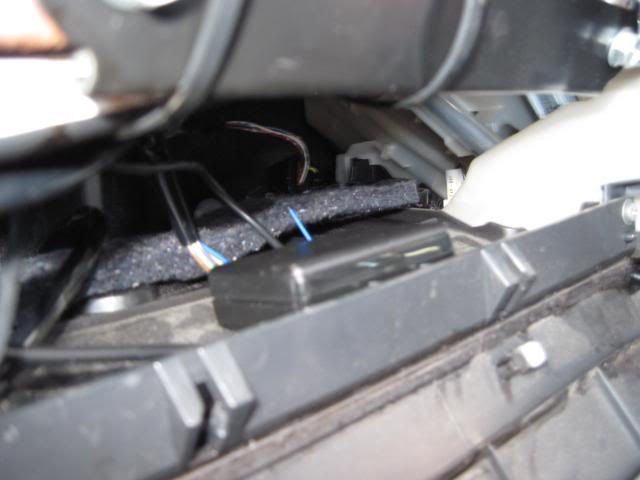 Fifth is to connect the OBD connection to the OBD port under your dash, as far as I can tell these two connections are to simply draw power to the control box and readout device when the car is turned on. It is confirmed from a seller of a similar unit, that you could Hardwire the device using the two wires from the OBD, thus allowing usage of other OBD port devices. (Scangauge, etc) 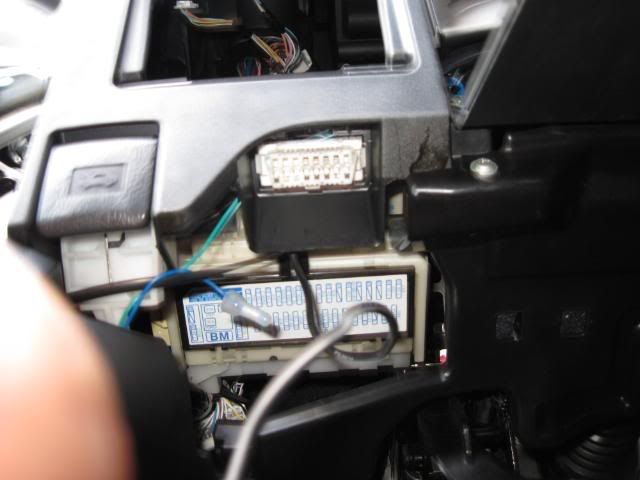 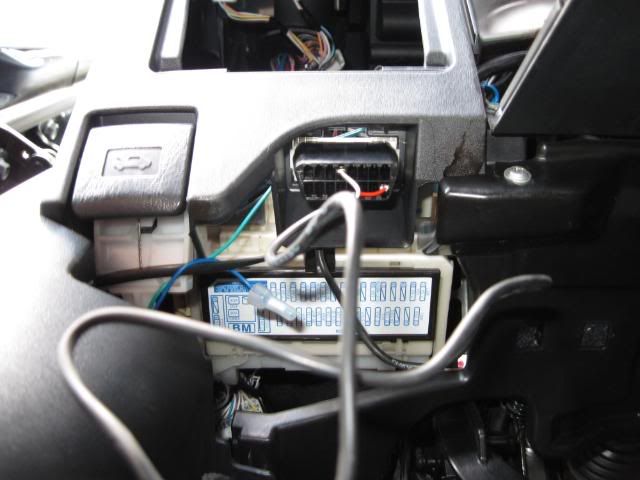 Once you connect the OBD to the control box, a red light should blink on the control box itself, letting you know that the control box is receiving power. Next step is to connect the readout display to the control box, this will allow the readout to have power. This step is a bit more complex, because you will need to route your wires to wherever your mounting location is. I fabricated a little plate and mounted mine right under my CD player using the double sided tape, then adjusted it a little to get it at a perfect angle to be seen and to modify settings while driving. 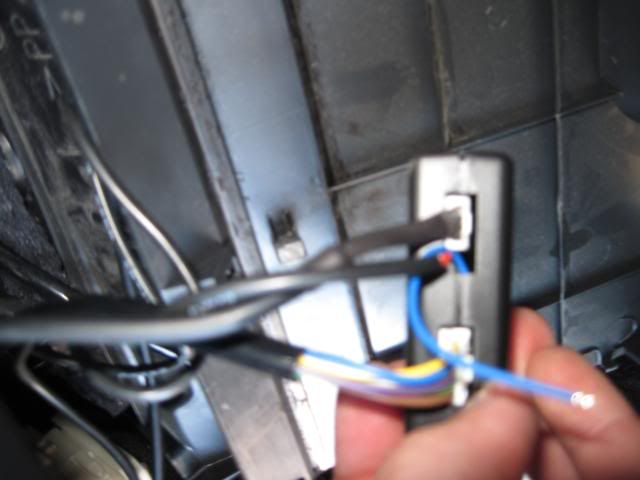 Finished Mounting: 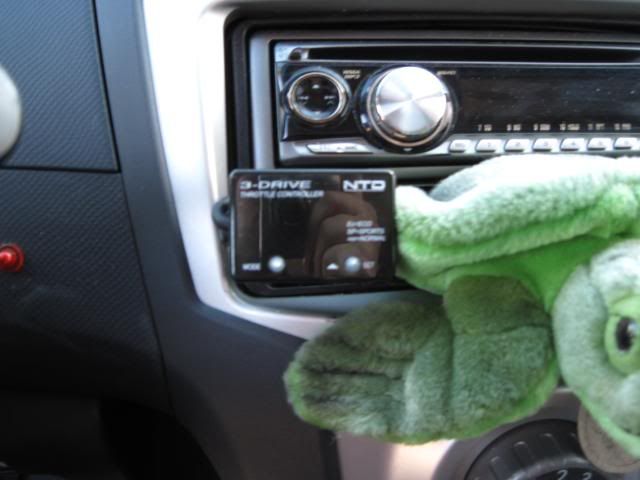 Clean up all your wires, replace any panels you had to remove, then comes programming the control unit to the cars accelerator and throttle system… Once you have everything connected it is a matter of programming the unit to the actual car. This is a simple process. Programing the Unit: 1) Turn the car to the accessories setting, do not actually start the car. If you mess up, turn the car off and set it up to the accessories setting again. 2) You will notice that the readout should go straight to the “norm” readout, which is NORMAL, next you press and hold the MODE button, the readout will then go to “- - -”, then go to the number 7, it will continue to count down to 0, keep holding the button so it can go all the way to 0, when it gets to the next view, you can let go of the MODE button. 3) Next there is now what should be a readout showing .8 or something similar, this is a voltage meter to what is going through the accelerator pedal, this is what actually is controlling the throttle position in the car. This display should be flashing. 4) Now, with the display still flashing you do not touch the gas pedal, let it up all the way to 0% pressed. Mine was at .8 when it was all the way up. Press the SET button so it will now program this new number at the 0% accelerator pressed memory. 5) After you set the 0% memory, it will now say the words SET, then go to another display of the same thing, flashing voltage meter. Now press the accelerator 100% in, I chose 95% because if you press it into the floor, rarely do you press that hard to reach full throttle. Your new readout on the box should be 3.7 or similar. Press SET to save this as your 100% memory. I made a small video to show what exactly steps need to be done. http://www.youtube.com/watch?v=jtje6HPT0CY After this, the device should now go back to its functions. “norm” should now come up on the display, which means programming is complete and you can now start the car and play with the device. I opted to not install the reverse cancel wire at this moment, because I didn’t have the proper tools to do this. I will update this thread later with the proper procedure, although it has been covered in the install thread for the Blitz unit. Once you have the unit installed and programmed, the way you change through the different function is easy: MODE is used to change between the 3 different settings, whether that be norm/sp/or ec. SET is used to change between SP’s 7 settings and EC’s 5. Review: Well I spent about half an hour driving the car and playing around with the device, originally I had some stutter issues with the throttle, but I resolved that by reprogramming the device with the accelerator memory. After I resolved this, the car seemed to adapt well. One thing you will notice while driving, it does show you a little readout with your throttle position. Lowest I noted it would be is 15%, highest 100%. There are basically 3 major functions to the device, “Norm” “SP (1-7)” and “Ec 1-5” SP Being Sports mode, and EC being Eco. Norm refers to the normal settings. With the Ec settings, you get 5 sublevels of programming to play with, 1 being the least, 5 being most. This actually retards the throttle level, to make it where you can obtain more miles per gallon through the throttle allowing less air, hence making for a slower acceleration of the vehicle. Sp runs along the same lines, it advances the throttle depending on the level chosen (1 being least, 7 is most) This is actually interesting to see the car just open throttle faster, especially in first gear. Higher gears it just allows the throttle to respond a bit snappier than normal. As for the actual feel for the car, Eco modes take some getting used to, the response feel sluggish, but in a good way due to that’s the actual function in that mode. Sports settings are the same kind of feel, have to get used to it, but the car feels less laggy when it comes to when you step on the gas pedal. I actually did this while driving, stay at a constant 40mph, keeping the throttle the same. Keep the unit in the “norm” settings…note mentally the way the car feels at that mode, then switch the car to SP, then go through the settings 1-7. You actually feel the car take gradual steps up in the throttle, IF you have a tach, this would be noted also through RPM levels. This actually works the same in the Eco settings, the throttle steps down in notches that you can actually feel. It is a neat effect and really shows you that the unit is doing something to modify your throttle position. After having the chance to play with the unit first hand, its definitely something to have if your looking for that less laggy feel of the while driving, or even just trying to squeeze that extra MPG out of every tank. It is a must option for those who are wanting the Blitz Control unit, but don’t want the near $350 price tag. I sure enjoy this unit at the current moment, and will be updating this thread over the period of a month with any discoveries or changes in MPG. Please PM me with any questions or concerns regarding unit install or function. Also I am including the PDF for a Pivot Unit that is essentially the same unit and instructions are directly the same.
__________________
07 Toyota Yaris Hatchback -sold- 11 Mazdaspeed 3 -SRI/TIP, 3 inch TBI, Custom FMIC, Tuned by Cobb Accessport, HKS ssq2 BOV, Upgraded HPFP- Clean stock look... Killer performance. |

|

|
|
|
 Similar Threads
|
||||
| Thread | Thread Starter | Forum | Replies | Last Post |
| Testing water on 3 Drive Throttle Controller for Yaris (Vitz) | twpanson | Performance Modifications | 57 | 10-31-2009 02:07 AM |
| Blitz throttle controller | 808_Yaris | Performance Modifications | 43 | 10-22-2009 04:36 AM |
| 3 Drive Throttle Controller | fei | Performance Modifications | 12 | 09-05-2009 08:31 AM |
| For Sale: 1ZZ Throttle Body and 0.25" aluminum wheel spacers | m911gt | Items for Sale by private party | 6 | 04-25-2009 08:52 PM |
| toyotafest 2007 | esquiva | Photo-Video-Media Gallery | 36 | 05-15-2007 12:03 PM |


 Threaded Mode